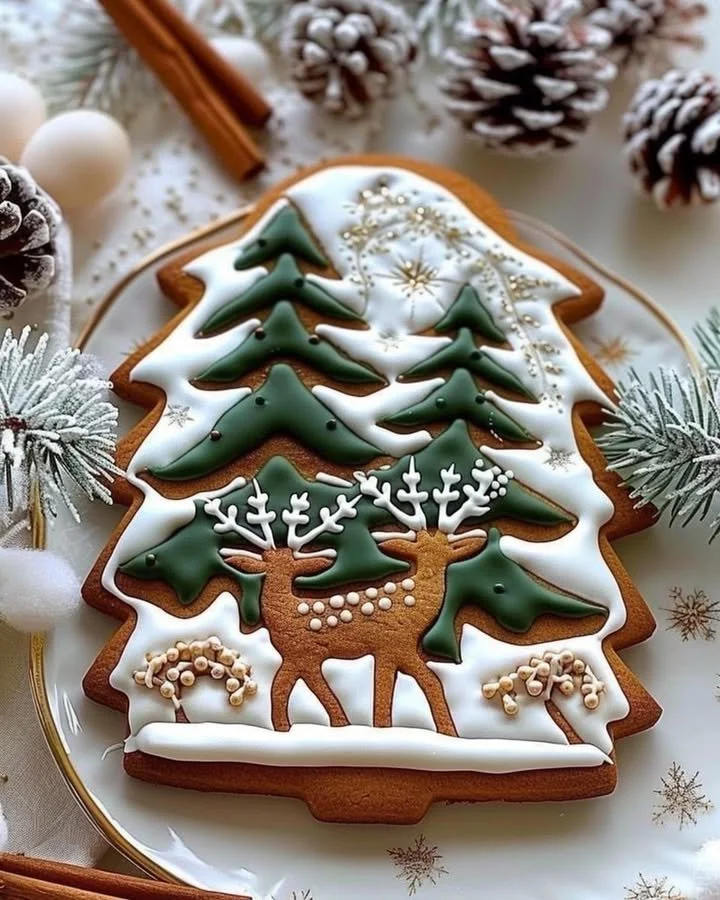
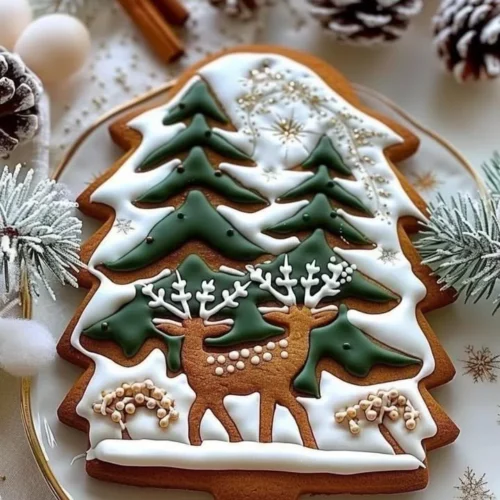
Gingerbread Cookies with Winter Forest Design are a delightful treat, perfect for the festive season. With their warm spices and sweet aroma, these cookies evoke the joy and nostalgia of holiday gatherings. Easy to make and enchanting to decorate, they not only serve as a delicious snack but also as a beautiful centerpiece for your holiday table. The step-by-step approach makes this recipe accessible to bakers of all skill levels, ensuring that you can create lovely batches with your loved ones.
Why You’ll Love This Recipe
This Gingerbread Cookies with Winter Forest Design recipe is a surefire crowd-pleaser. With an uncomplicated list of ingredients and minimal prep time, it’s perfect for gathering the family in the kitchen. These cookies offer a delightful combination of crispy yet chewy textures, making them the ideal treat to munch on while sipping hot cocoa. Plus, the artistic fun of decorating with royal icing and edible decorations adds a creative aspect that kids and adults alike can enjoy. Baking and decorating these cookies isn’t just about the end result but also the memories created along the way.
Ingredients
To make these delectable Gingerbread Cookies with Winter Forest Design, you’ll need:
- 3 1/4 cups all-purpose flour for a firm, chewy base.
- 3/4 teaspoon baking soda to give them a touch of lift.
- 1 tablespoon ground ginger for that signature spice.
- 1 tablespoon ground cinnamon for warm, comforting flavor.
- 1/4 teaspoon ground cloves to elevate the aroma.
- 1/4 teaspoon nutmeg for a hint of seasonal delight.
- 1/2 teaspoon salt to balance the sweetness.
- 1/2 cup unsalted butter, softened to create a rich, buttery spread.
- 1/2 cup packed brown sugar to give a deep, caramel-like sweetness.
- 1 large egg to bind the dough together.
- 2/3 cup unsulfured molasses for a deep, rich flavor.
- 1 teaspoon pure vanilla extract for a delightful undertone.
For decoration:
- 3 cups powdered sugar for the icing.
- 2 large egg whites or 3 tablespoons meringue powder mixed with 6 tablespoons water for a smooth royal icing.
- 1/2 teaspoon vanilla or almond extract to enhance the icing flavor.
- Gel food coloring (green, white, brown, and optional blue) to bring your winter forest to life.
- Edible gold dust (optional for the deer) to add a festive touch.
- Fine sugar or edible glitter for a snowy effect.
- A small brush for intricate detailing.
- Piping bags and small piping tips (round and leaf tips) for creating beautiful designs.
Step-by-Step Directions
In a medium bowl, whisk together the all-purpose flour, baking soda, ground ginger, cinnamon, cloves, nutmeg, and salt. Set aside.
In a large bowl, cream the softened butter and brown sugar together until light and fluffy. Add the egg, molasses, and vanilla extract, mixing until well combined.
Gradually add the dry ingredients to the wet ingredients, stirring until a dough forms. If the dough is too sticky, add a little more flour until it is firm enough to handle.
Divide the dough into two portions, wrap in plastic wrap, and chill in the fridge for at least 1 hour.
Preheat your oven to 350°F (175°C). Line baking sheets with parchment paper.
On a lightly floured surface, roll out one portion of the dough to about 1/4-inch thickness. Use cookie cutters to cut out your desired shapes (trees, deer, snowflakes, etc.).
Place the cookie cutouts on the prepared baking sheets and bake for 8-10 minutes or until the edges are lightly golden.
Let the cookies cool on the baking sheets for a few minutes before transferring them to a wire rack to cool completely.
To prepare the royal icing, beat the egg whites (or meringue powder mixture) until stiff peaks form. Gradually add powdered sugar and vanilla extract, continuing to beat until the icing is smooth and stiff.
Divide the icing into bowls and add gel food coloring to each bowl (green for trees, brown for deer, white for snow, etc.).
Use piping bags fitted with small tips to pipe the royal icing onto the cookies, creating intricate winter forest designs—trees, deer, snowflakes, and snowy effects.
For the finishing touches, use edible gold dust on the deer, sprinkle fine sugar or edible glitter for a snow effect, and use a small brush for detailing.
Allow the royal icing to dry completely before serving or packaging the cookies.
Tips & Tricks
For even richer flavors, consider letting the dough rest overnight in the fridge. This way, the spices have more time to infuse into the dough. Make sure to roll out the dough evenly to achieve consistent cookies that bake uniformly. If you want to add a little zing, try including a pinch of pepper to the dough. And when decorating, don’t be afraid to experiment with your designs—each cookie can become its own unique piece of winter wonderland.
Serving Suggestions & Pairings
These Gingerbread Cookies with Winter Forest Design are fantastic to serve at holiday gatherings or as a sweet gift during the season. Pair them with a hot cup of ginger tea or rich hot chocolate for a cozy experience. They are also perfect for cookie swaps, adding a festive flair to any occasion. The decorative aspect makes them not only a treat but also delightful décor on dessert tables.
Nutritional Information
Each Gingerbread Cookie contains approximately 100 calories. This delightful treat may include around 4g of fat, 15g of carbohydrates, and 1g of protein. Enjoying these cookies in moderation helps maintain balance, especially during the festive season.
Storing Tips & Variations
Store your Gingerbread Cookies in an airtight container to keep them fresh for up to a week. If you want to make them ahead of time, these cookies freeze beautifully—just layer them with parchment paper to prevent sticking. Variations on this recipe could include adding chopped nuts or dried fruits to the dough, or trying different spice combinations according to personal preference.
Conclusion
Gingerbread Cookies with Winter Forest Design are not just a culinary delight; they’re a gateway to crafting heartwarming memories with family and friends. Creating these cookies can become a holiday tradition, bringing joy and sweetness into your celebrations. We encourage you to try this delightful recipe and share your gingerbread creations and decorating experiences!
FAQs
Can I use different spices in this recipe?
Absolutely! Feel free to experiment with different spices including cardamom or allspice for a unique flavor twist.How can I make these cookies vegan-friendly?
You can substitute the egg with a flaxseed mixture (1 tablespoon ground flaxseed + 2.5 tablespoons water) and use a vegan butter alternative.What type of food coloring works best for royal icing?
Gel food coloring is preferred as it provides vibrant colors without altering the icing’s consistency drastically.Can I use store-bought icing instead of making royal icing?
Yes, store-bought icing can work well! Just ensure it’s thick enough for piping and decorating.How can I recycle the remaining dough?
Any remaining dough can be blended with the next batch to create a mixed cookie variety or rolled into small balls and baked as drop cookies for quicker gratification.
Gingerbread Cookies with Winter Forest Design
Ingredients
For the cookie base
- 3 1/4 cups all-purpose flour for a firm, chewy base.
- 3/4 teaspoon baking soda to give them a touch of lift.
- 1 tablespoon ground ginger for that signature spice.
- 1 tablespoon ground cinnamon for warm, comforting flavor.
- 1/4 teaspoon ground cloves to elevate the aroma.
- 1/4 teaspoon nutmeg for a hint of seasonal delight.
- 1/2 teaspoon salt to balance the sweetness.
- 1/2 cup unsalted butter, softened to create a rich, buttery spread.
- 1/2 cup packed brown sugar to give a deep, caramel-like sweetness.
- 1 large egg to bind the dough together.
- 2/3 cup unsulfured molasses for a deep, rich flavor.
- 1 teaspoon pure vanilla extract for a delightful undertone.
For decoration
- 3 cups powdered sugar for the icing.
- 2 large egg whites or 3 tablespoons meringue powder mixed with 6 tablespoons water for a smooth royal icing.
- 1/2 teaspoon vanilla or almond extract to enhance the icing flavor.
- Gel food coloring (green, white, brown, and optional blue) to bring your winter forest to life.
- Edible gold dust optional for the deer.
- Fine sugar or edible glitter for a snowy effect.
- A small brush for intricate detailing.
- Piping bags and small piping tips (round and leaf tips) for creating beautiful designs.
Instructions
Preparation
- In a medium bowl, whisk together the all-purpose flour, baking soda, ground ginger, cinnamon, cloves, nutmeg, and salt. Set aside.
- In a large bowl, cream the softened butter and brown sugar together until light and fluffy. Add the egg, molasses, and vanilla extract, mixing until well combined.
- Gradually add the dry ingredients to the wet ingredients, stirring until a dough forms. If the dough is too sticky, add a little more flour until it is firm enough to handle.
- Divide the dough into two portions, wrap in plastic wrap, and chill in the fridge for at least 1 hour.
Baking
- Preheat your oven to 350°F (175°C). Line baking sheets with parchment paper.
- On a lightly floured surface, roll out one portion of the dough to about 1/4-inch thickness. Use cookie cutters to cut out your desired shapes (trees, deer, snowflakes, etc.).
- Place the cookie cutouts on the prepared baking sheets and bake for 8-10 minutes or until the edges are lightly golden.
- Let the cookies cool on the baking sheets for a few minutes before transferring them to a wire rack to cool completely.
Decorating
- To prepare the royal icing, beat the egg whites (or meringue powder mixture) until stiff peaks form. Gradually add powdered sugar and vanilla extract, continuing to beat until the icing is smooth and stiff.
- Divide the icing into bowls and add gel food coloring to each bowl (green for trees, brown for deer, white for snow, etc.).
- Use piping bags fitted with small tips to pipe the royal icing onto the cookies, creating intricate winter forest designs—trees, deer, snowflakes, and snowy effects.
- For the finishing touches, use edible gold dust on the deer, sprinkle fine sugar or edible glitter for a snow effect, and use a small brush for detailing.
- Allow the royal icing to dry completely before serving or packaging the cookies.