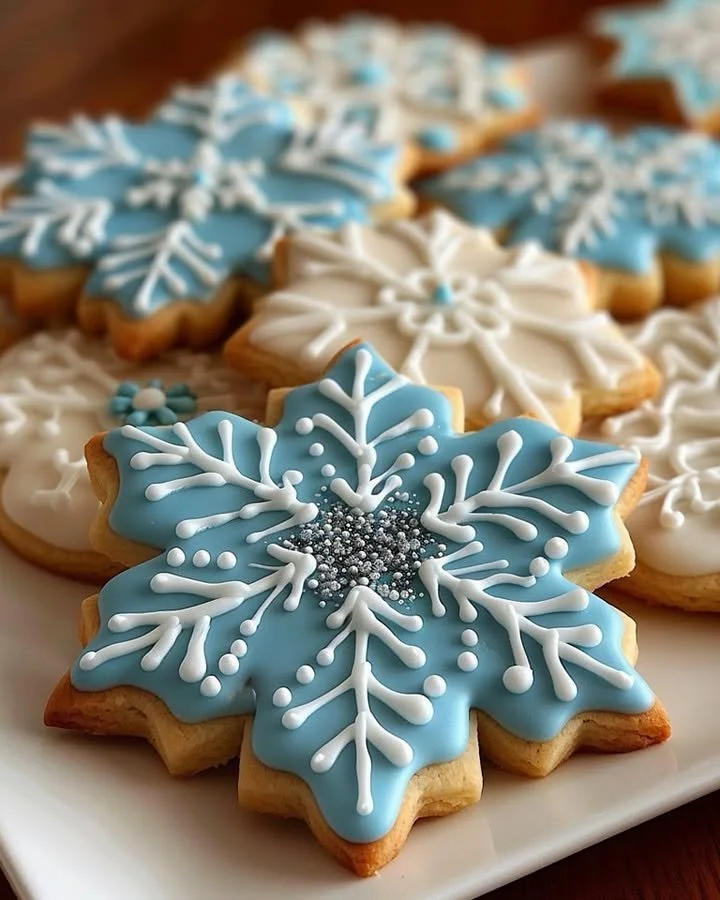
Snowflake Sugar Cookies
The enchanting aroma of freshly baked cookies wafts through the kitchen, evoking memories of joyous holiday gatherings, laughter, and wintry celebrations. Snowflake Sugar Cookies are not just ordinary sweets; they’re crafted with love and sprinkled with a hint of magic. This recipe is a delightful step-by-step journey into creating cookies that embody the spirit of the season. With a buttery richness and a tender crumb, this sweet treat will beckon you to the kitchen, where the warmth of the oven and the glimmer of sugar will inspire your inner pastry chef.
History / Fun Fact
Snowflake Sugar Cookies have a storied past intertwined with holiday festivities. Originating in Europe, similar cookie traditions date back to the 18th century when families would bake and decorate biscuits for Christmas and New Year celebrations. The snowflake shape symbolizes winter’s beauty, making these cookies an evocative representation of the season’s joy. Interestingly, many families have transformed the simple sugar cookie into their own holiday tradition, joining together to create decorative masterpieces that carry stories, laughter, and, most importantly, memories for generations.
Ingredients
To make these exquisite Snowflake Sugar Cookies, gather the following ingredients that inspire both taste and aroma:
- 2 3/4 cups all-purpose flour, light and airy for a delicate bite
- 1 teaspoon baking powder to ensure a delightful rise
- 1/2 teaspoon salt, enhancing the sweetness perfectly
- 1 cup unsalted butter, softened to creamy perfection
- 1 1/2 cups sugar, sweet and sparkly like snowflakes themselves
- 1 large egg for binding and richness
- 1 teaspoon vanilla extract, aromatic and comforting
- 1/2 teaspoon almond extract (optional), adding a warm, nutty note to the profile
- 1 egg white (or 2 tablespoons meringue powder) for a glossy finish
- 1 1/2 cups powdered sugar, fluffy and sweet for icing
- 1/2 teaspoon lemon juice, brightening up the flavors
- Food coloring (optional for decoration), turning your cookies into colorful statements of art
These ingredients, when combined, will create cookies that are soft, sweet, and utterly irresistible.
Cooking Time & Tips for Snowflake Sugar Cookies
When it comes to preparing Snowflake Sugar Cookies, one can choose between a quick preparation or a more leisurely approach. If you’re pressed for time, sticking to the recipe and prioritizing efficiency will yield delicious cookies in under an hour. However, taking your time to roll out the dough, chill it properly, and decorate intricately allows for greater creativity and enjoyment in the process.
For optimal results, ensure your butter is softened but not melted for the perfect texture, and flour your surface adequately to avoid any stickiness when rolling out the dough. Always keep your icing consistency in mind; it should be easy to pipe or spread but hold its shape once applied.
Step-by-Step Directions
Begin by preheating your oven to a warm 350°F (175°C), filling your home with a cozy ambiance perfect for baking. Line your baking sheets with parchment paper, allowing for easy cookie removal later on.
In a medium bowl, whisk together 2 3/4 cups of all-purpose flour, 1 teaspoon of baking powder, and 1/2 teaspoon of salt. The aroma of the flour will mingle with the other ingredients, creating a warm welcome to the adventure.
In a large bowl, beat 1 cup of softened unsalted butter with 1 1/2 cups of sugar until light and fluffy. The transformation will be magical as it cream together into a rich mixture—watch as it turns pale and airy.
Add in your large egg, along with 1 teaspoon of fragrant vanilla extract and 1/2 teaspoon almond extract if using. Mix well, enveloping the mixture with delightful aroma and flavor.
Gradually add your whisked dry ingredients into this creamy concoction and blend until the dough comes together, creating a solid base that will yield tender cookies.
Roll out the dough on a floured surface to about 1/4 inch thick. Feel the softness of the dough beneath your rolling pin—this tactile pleasure is a reminder of the care you’ve infused into your baking.
Use a snowflake-shaped cookie cutter to cut out your cookies. Place them on the prepared baking sheets in a cozy arrangement and give a gentle tap to flatten any uneven pieces.
Bake for 8-10 minutes or until the edges are lightly golden. Allow the cookies to expand and rise beautifully as you anticipate their delightful flavor.
Once done, transfer the cookies to a wire rack and let them cool completely, a necessary pause where you can take a moment to savor your creation.
For the royal icing, whisk your egg white or meringue powder with 1/2 teaspoon lemon juice until soft peaks form—this is where the magic begins. Gradually add in the 1 1/2 cups of powdered sugar, whisking until stiff peaks form—this sturdy icing will be your canvas for creativity.
Divide the icing into bowls and add food coloring if desired, spinning the wheels of creativity as you prepare to adorn your cookies in beautiful snowflake designs.
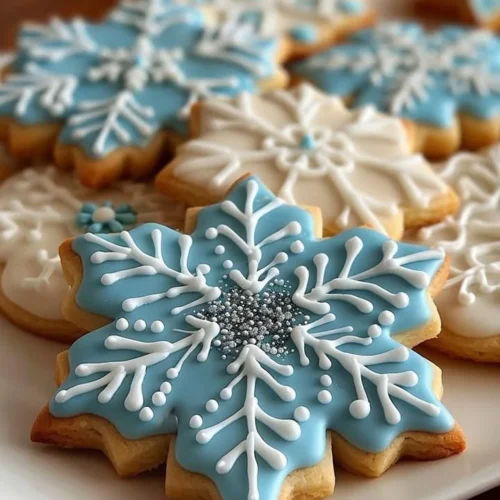
Use the icing to create enchanting snowflake patterns on your cooled cookies. Allow the icing to dry completely before serving or packaging—patience will bring forth the joy of your hard work.
Serving Suggestions & Occasions
Snowflake Sugar Cookies are an exquisite treat for numerous occasions, from holiday gatherings to winter parties. They make a fantastic addition to any dessert table, charmingly packaged in decorative tins or gift bags that warm the hearts of friends and family. Consider sharing these delightful morsels over festive coffee dates or as a whimsical treat at children’s parties. Their decorative nature turns every bite into a celebration, making them perfect for sharing love and joy during chilly winter evenings.
Common Mistakes for Snowflake Sugar Cookies
While baking Snowflake Sugar Cookies is an exciting endeavor, some common mistakes can sabotage your efforts. One prevalent issue is overmixing the dough, leading to tough cookies that lack the desired melt-in-your-mouth texture. Another mistake involves skipping the cooling step after baking; this can cause the cookies to break or lose their shape before icing. Pay careful attention to measuring ingredients; too much flour can lead to overly dry cookies. Finally, a rush in decorating can lead to smudged icings—take your time for precision and artistry with each cookie.
Healthier Alternatives & Variations
If you’re looking to make your Snowflake Sugar Cookies a bit healthier, consider substituting the all-purpose flour with whole wheat flour, which will add a nutritious touch while maintaining texture. You can also reduce sugar by using natural substitutes like honey or maple syrup, adjusting the fluid content accordingly. For a vegan twist, switch the butter with coconut oil and replace the egg with flaxseed meal combined with water, and enjoy the same festive delight using plant-based ingredients. Each variation can add a twist, transforming your cookies into an edible expression of creativity.
FAQs
Can I freeze Snowflake Sugar Cookies?
Absolutely! Once cooled, you can freeze the cookies in an airtight container for later enjoyment.How long will the iced cookies last?
Iced Snowflake Sugar Cookies can be stored at room temperature for up to one week, perfect for enjoying throughout the holiday season.What can I use if I don’t have meringue powder?
You can substitute meringue powder with an egg white, though ensure consumption is safe—consider raw egg alternatives.Can I use cookie cutters for different shapes?
Yes! While snowflake shapes are classic, feel free to explore stars, trees, or any holiday-themed shapes that excite your imagination.Is there a way to make gluten-free Snowflake Sugar Cookies?
Certainly. You can substitute all-purpose flour with a gluten-free blend to accommodate dietary restrictions.How do I achieve different colors in my icing?
Simply add food coloring gradually to your royal icing until you reach the desired shade—let your creativity shine!
Conclusion
The enchanting experience of baking Snowflake Sugar Cookies awaits you! With their buttery texture and eye-catching designs, these cookies are not just treats—they are the essence of winter warmth and happiness. As you bake, remember that each step is a delightful journey filled with creativity and love. Tempted to experience this magical recipe? Gather your ingredients and start this sweet adventure right away—your kitchen deserves the joy of cookies!
Snowflake Sugar Cookies
Ingredients
For the Cookies
- 2 3/4 cups all-purpose flour light and airy for a delicate bite
- 1 teaspoon baking powder to ensure a delightful rise
- 1/2 teaspoon salt enhancing the sweetness perfectly
- 1 cup unsalted butter, softened to creamy perfection
- 1 1/2 cups sugar sweet and sparkly like snowflakes
- 1 large egg for binding and richness
- 1 teaspoon vanilla extract aromatic and comforting
- 1/2 teaspoon almond extract (optional) adding a warm, nutty note
For the Icing
- 1 egg white (or 2 tablespoons meringue powder) for a glossy finish
- 1 1/2 cups powdered sugar fluffy and sweet for icing
- 1/2 teaspoon lemon juice brightening up the flavors
- Food coloring (optional) for decoration
Instructions
Preparation
- Preheat your oven to 350°F (175°C) and line your baking sheets with parchment paper.
- In a medium bowl, whisk together the flour, baking powder, and salt.
- In a large bowl, beat the softened butter with sugar until light and fluffy.
- Add the egg, vanilla extract, and almond extract (if using). Mix well.
- Gradually add the dry ingredients to the creamy mixture and blend until the dough comes together.
- Roll out the dough on a floured surface to about 1/4 inch thick.
- Use a snowflake-shaped cookie cutter to cut out cookies and place them on the prepared baking sheets.
Baking
- Bake cookies for 8-10 minutes or until the edges are lightly golden.
- Transfer cookies to a wire rack and let them cool completely.
Icing Preparation
- Whisk egg white or meringue powder with lemon juice until soft peaks form.
- Gradually add powdered sugar and whisk until stiff peaks form.
- Divide icing into bowls and add food coloring if desired.
- Use icing to create snowflake patterns on cooled cookies.
- Allow icing to dry completely before serving or packaging.