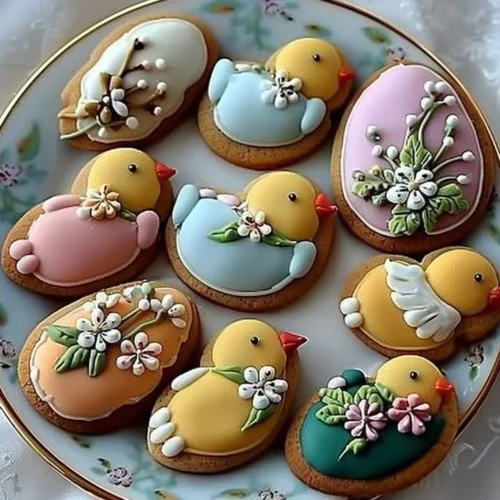
Easter Cookies with Chick and Flower Designs are the perfect way to celebrate the joy and renewal of the season! These delightful treats, adorned with adorable designs, evoke memories of childhood baking sessions and cozy family gatherings. They are not only festive but also wonderfully easy to make, making them a fantastic project for both kids and adults alike. The combination of buttery sweetness and colorful icing brings happiness to any Easter celebration, filling your home with warmth and laughter. This Step-by-Step Recipe will guide you in creating these charming cookies that will have everyone smiling!
Why You’ll Love This Recipe
This Easter cookie recipe is a winner for several reasons. First, it boasts minimal ingredients; most are pantry staples you likely already have on hand. The preparation is quick, meaning you can bake a batch for unexpected guests or last-minute celebrations without any stress. These cookies also make for a perfect group activity, allowing families and friends to come together and engage in the joy of decorating. Lastly, they are crowd-pleasers, guaranteed to satisfy both young and old with their delightful flavors and charming designs.
Ingredients
To create these Easter Cookies with Chick and Flower Designs, gather the following ingredients:
- 250g butter (room temperature): Creamy and luscious, this butter serves as the base of our cookies, creating a rich, melt-in-your-mouth texture.
- 150g powdered sugar: This sweet, fluffy sugar effortlessly blends into the dough, adding a subtle sweetness that perfectly complements the buttery flavor.
- 1 egg: This egg provides the structure for our cookies while contributing to their delightful crumb.
- 1 tsp vanilla extract: The aromatic scent of vanilla elevates these cookies with a comforting, sweet essence.
- 350g all-purpose flour: Essential for structure, this flour forms the backbone of our dough, creating the perfect balance of tenderness and bite.
- 1 tsp baking powder: This gentle leavening agent ensures our cookies rise slightly, giving them the ideal texture.
- Pinch of salt: A small touch that enhances all the other flavors, bringing harmony to our sweet treats.
- White and colored icing (for decoration): The vibrant icing will bring our cookie designs to life!
- Food coloring (yellow, green, pink, blue): These colors are perfect for creating lively and Easter-themed decorations.
Step-by-Step Directions
Preheat the oven to 350°F (175°C) and line a baking sheet with parchment paper. Setting the oven temperature correctly is essential for achieving that golden-brown finish on our cookies!
Cream together the butter and powdered sugar until light and fluffy. This step creates a delightful base that ensures a rich texture in our cookies. Take your time and use a mixer or a sturdy wooden spoon to achieve the fluffiness.
Add the egg and vanilla extract, mixing until combined. The egg adds moisture and structure, while the vanilla fills the batter with rich, aromatic notes.
In another bowl, whisk together the flour, baking powder, and salt, then gradually add to the butter mixture until a dough forms. Mixing slowly allows the flour to incorporate without creating a mess, ensuring a smoother dough.
Divide the dough, refrigerate if too soft, then roll out to 1/4 inch thick. Resting the dough makes it easier to handle, while rolling it out to the right thickness will yield cookies that are the perfect combination of crispy and tender.
Cut out shapes with cookie cutters and place on the baking sheet. Choose fun chick and flower designs to match your Easter theme, inspiring smiles and excitement.
Bake for 8-10 minutes until golden around the edges; let cool. Keeping an eye on your cookies will prevent them from overbaking, ensuring they stay soft inside.
Prepare icing in various colors using food coloring. Mix carefully to achieve your desired hue, making sure your icing is smooth and spreadable.
Decorate cooled cookies with icing and let dry before serving. This is the fun part where you can let your creativity shine! Enjoy designing delightful treats that will brighten anyone’s day.
Tips & Tricks
To make your Easter cookies even more delightful, consider adding lemon zest to the dough for a refreshing citrus twist. This subtle flavor will enhance the cookie base beautifully, leaving a hint of brightness with every bite. For the icing, using different piping tips will allow for additional texture and detail in your designs. Remember to let the cookies cool completely before decorating to prevent any smudging. Lastly, for a touch of sparkle, sprinkle edible glitter over the icing once it has dried but is still slightly tacky!
Serving Suggestions & Pairings
These Easter Cookies with Chick and Flower Designs are a delightful addition to any spring gathering. They pair wonderfully with a cup of herbal tea or a refreshing lemonade. For a festive table setting, consider presenting them on a colorful platter surrounded by fresh flowers. They also work well as party favors, lovingly wrapped in cellophane and tied with a cheerful ribbon for guests to take home and enjoy.
Nutritional Information
Each cookie is approximately 120 calories, making them a sweet treat to enjoy in moderation. They contain a fair amount of sugar and fat, so balance is key! Pair them with a fresh fruit salad or a lighter dessert option for a harmonious Easter feast.
Storing Tips & Variations
To store your cookies, keep them in an airtight container at room temperature for up to a week. For longer preservation, you can freeze the unbaked dough; simply wrap it tightly in plastic wrap before placing it in an airtight bag. When you’re ready to enjoy, thaw in the refrigerator and bake as needed. For variations, feel free to experiment with different cookie shapes for other holidays or use a variety of flavored extracts like almond or lemon in the dough.
Conclusion
Easter Cookies with Chick and Flower Designs are a wonderful way to celebrate the season with family and friends. Their charming appearance and delightful flavor make them a must-try. We encourage you to dive into this recipe, enjoy the process, and create beautiful memories in the kitchen. Don’t forget to share your creations and thoughts; we love hearing about your baking adventures!
FAQs
Can I make these cookies ahead of time?
Yes! You can bake the cookies in advance and store them in an airtight container for up to a week. Decorate them closer to your celebration for the freshest look.What if my dough is too sticky?
If the dough is sticky, try chilling it in the refrigerator for 30 minutes to firm it up. This will make it easier to roll out and cut into shapes.Can I use margarine instead of butter?
While margarine can be used, it may alter the flavor and texture. Butter provides the best taste and a classic cookie texture.How can I achieve clean lines when decorating?
Allow the icing to dry slightly before adding details. Using a piping bag with a small tip can help you achieve intricate designs and clean lines.What are some other shapes I can make?
Feel free to use cookie cutters in various shapes, such as bunnies, eggs, or hearts, to cater to any holiday or occasion!
Easter Cookies with Chick and Flower Designs
Ingredients
Cookie Ingredients
- 250 g butter (room temperature) Creamy and luscious, this butter serves as the base of our cookies.
- 150 g powdered sugar Adds a subtle sweetness that perfectly complements the buttery flavor.
- 1 piece egg Provides the structure for our cookies.
- 1 tsp vanilla extract Elevates these cookies with a comforting, sweet essence.
- 350 g all-purpose flour Forms the backbone of our dough.
- 1 tsp baking powder Ensures our cookies rise slightly for the ideal texture.
- 1 pinch salt Enhances all the other flavors.
Decoration Ingredients
- white and colored icing For decorating the cookies.
- food coloring (yellow, green, pink, blue) For creating vibrant decorations.
Instructions
Preparation
- Preheat the oven to 350°F (175°C) and line a baking sheet with parchment paper.
- Cream together the butter and powdered sugar until light and fluffy.
- Add the egg and vanilla extract, mixing until combined.
- In another bowl, whisk together the flour, baking powder, and salt, then gradually add to the butter mixture until a dough forms.
- Divide the dough, refrigerate if too soft, then roll out to 1/4 inch thick.
Baking
- Cut out shapes with cookie cutters and place on the baking sheet.
- Bake for 8-10 minutes until golden around the edges; let cool.
Decoration
- Prepare icing in various colors using food coloring.
- Decorate cooled cookies with icing and let dry before serving.