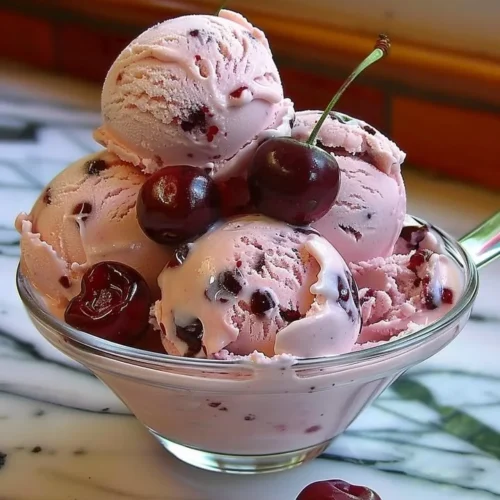
Homemade Cherry Ice Cream
Indulging in a bowl of Homemade Cherry Ice Cream delivers a burst of nostalgia as the rich, creamy texture melts on your tongue, mingled with the sweet-tart complexity of juicy cherries. This recipe offers a step-by-step guide to creating a refreshing treat that’s perfect for those warm days when the sun shines brightly. The enticing aroma of vanilla and fresh cherries fills the kitchen, transporting you to leisurely summer afternoons spent in bliss. Every spoonful is a delight, evoking cherished memories and inviting you to savor the season’s finest flavors.
History / Fun Fact
Ice cream holds a place of honor in dessert history, dating back to ancient China around A.D. 200 when a mixture of milk and rice was frozen in snow. The evolution of ice cream has progressed through various cultures and innovations, with cherries uniquely weaving themselves through its sweet history. Roman emperors enjoyed frozen desserts made from snow and fruit juices. Today, cherry ice cream is a beloved favorite, often associated with summertime and cottage getaways. Did you know that in the United States, the popularization of cherry ice cream soared in the late 19th century, showcasing the deliciousness of cherries picked fresh from orchards? Making this delight at home connects you not only to its rich history but also lets you enjoy a lush creation made with love.
Ingredients
To create this delightful cherry ice cream, you will need:
- 2 cups of pitted and halved cherries: fragrant, sweet, and ripened to perfection, these cherries bring forth a burst of juicy goodness in each bite.
- 1 cup of heavy cream: creamy and rich, this defines the velvety texture that you will savor.
- 1 cup of whole milk: provides the necessary body, making the ice cream silky smooth.
- 3/4 cup of granulated sugar: sweet and sparkling, it balances the natural tartness of the cherries.
- 1 teaspoon of vanilla extract: aromatic and warm, this adds depth to the overall flavor.
- A pinch of salt: enhances flavors, giving a lift to sweetness.
Together, these ingredients create a harmonious blend, ensuring every spoonful is a taste of heaven.
Cooking Time & Tips For Homemade Cherry Ice Cream
When making Homemade Cherry Ice Cream, you have the option of a quick or a slow preparation method. Quick preparations focus on speed, perfect for unexpected guests or an impromptu treat, while slow preparations allow flavors to deepen over time, layering richer notes. If you have the luxury of time, letting the ice cream base sit in the fridge overnight can lead to flavors melding beautifully.
For success with this recipe, always use fresh, ripe cherries. If they’re out of season, frozen cherries will work but defrost them beforehand for even flavor distribution. Invest in a quality ice cream maker for the best texture. Remember to monitor the churning process closely, as over-churning can introduce excessive air, leading to an undesirable consistency.
Step-by-Step Directions
Start by tossing the pitted and halved cherries into a medium bowl. As you do, feel the smoothness of the cherries in your hands, and sprinkle 1/4 cup of sugar over them. Let them sit for about 30 minutes to macerate; this step allows the natural sweetness to emerge, turning your cherries into a luscious base.
In a separate bowl, whisk together 1 cup of heavy cream, 1 cup of whole milk, the remaining 1/2 cup of sugar, 1 teaspoon of vanilla extract, and a pinch of salt until the sugar is fully dissolved. The aroma of vanilla wafting through the air is divine, and you’ll feel the texture transforming into a creamy dream.
Once your cherry mixture is syrupy and smells inviting, fold it into the cream mixture gently. Take your time as you stir until everything is beautifully combined—each fold is a step closer to a delightful creation.
Now it’s time to churn! Pour this delightful mixture into your ice cream maker and churn according to the manufacturer’s instructions. As it transforms, watch it become thicker and creamier until you reach a soft-serve consistency. The anticipation builds—this is going to be heavenly.
Transfer your luscious ice cream into a lidded container and pop it in the freezer for at least 4 hours, or until it’s firm enough to scoop. The rich cherry color and creamy texture will beckon you every time you pass by the freezer.
Finally, serve up your homemade cherry ice cream in a bowl or cone, and enjoy the sweet, creamy goodness! A sprinkle of fresh cherries on top or a drizzle of chocolate syrup could elevate your creation even further, embodying a true indulgence.
Serving Suggestions & Occasions
Homemade Cherry Ice Cream shines as the star of summer gatherings, family barbecues, or simply a cozy evening in with loved ones. Serve it alongside a slice of rich chocolate cake for a decadent dessert pairing, or alongside a fruit tart for a delightful contrast. For a fun twist, put scoops in between two buttery cookies to create ice cream sandwiches. The versatility of this cherry ice cream will undoubtedly amaze you.
Common Mistakes For Homemade Cherry Ice Cream
Making homemade ice cream may seem straightforward, but there are common pitfalls to avoid. One mistake is not macerating the cherries long enough; this process pulls out their natural juices and flavor, enhancing the overall sweetness in your ice cream. Alternatively, don’t overlook the importance of chilling your ice cream mixture thoroughly before churning—this step ensures smoother texture and rapid freezing. Lastly, be cautious with churning time; over-churning can lead to icy crystals forming instead of the desired creaminess.
Healthier Alternatives & Variations
Don’t hesitate to customize your Homemade Cherry Ice Cream! For a healthier version, consider substituting half of the cream with Greek yogurt, which adds creaminess alongside a protein boost and tangy flavor. You can also swap the granulated sugar for honey or maple syrup for a more natural sweetener. If you wish to experiment, try adding a splash of almond extract instead of vanilla for a unique flavor profile. For a fun spin, mix in crushed lemon or lime zest to give your cherry ice cream a refreshing twist.
FAQs
Can I use frozen cherries for this recipe?
Yes, frozen cherries work well. Just ensure they are thawed and drained before using them in the recipe.Do I need an ice cream maker to make this recipe?
While an ice cream maker yields the best texture, you can also manually freeze the mixture in a dish, stirring every 30 minutes until firm.How long can I store homemade cherry ice cream?
You can store it in an airtight container in the freezer for up to 2 weeks, although it’s best enjoyed fresh.Can I add other fruits or flavors to this cherry ice cream?
Absolutely! Feel free to mix in fruits like strawberries or peaches for additional flavors, or add chocolate chips for a delightful surprise.Is it possible to make this dairy-free?
Yes, you can use coconut cream and almond or oat milk as substitutes for the cream and milk to make it dairy-free.What can I do if my ice cream is too hard after freezing?
If your ice cream becomes too hard, let it sit at room temperature for 5–10 minutes before scooping, which will soften it up.
Conclusion
Now that you’re equipped with this delightful recipe for Homemade Cherry Ice Cream, don’t hesitate to embark on your cherry-churning adventure! With the sweet aroma of fresh cherries and the delightful creaminess of the mixture, it promises to be a sensory experience you won’t want to miss. Collect your ingredients, invite a friend into the kitchen, and create a charming treat that will bring you and your loved ones joy. Try it immediately and relish the moment of indulging in your very own creation!
Homemade Cherry Ice Cream
Ingredients
Main Ingredients
- 2 cups pitted and halved cherries Fresh, ripe cherries bring a burst of juicy goodness.
- 1 cup heavy cream Defines the velvety texture.
- 1 cup whole milk Provides necessary body for smooth ice cream.
- 3/4 cup granulated sugar Balances the natural tartness of the cherries.
- 1 teaspoon vanilla extract Adds depth to the flavor.
- 1 pinch salt Enhances sweetness.
Instructions
Preparation
- Toss the pitted and halved cherries into a medium bowl and sprinkle 1/4 cup of sugar over them. Let them sit for about 30 minutes to macerate.
- In a separate bowl, whisk together 1 cup of heavy cream, 1 cup of whole milk, the remaining 1/2 cup of sugar, 1 teaspoon of vanilla extract, and a pinch of salt until the sugar is fully dissolved.
- Fold the syrupy cherry mixture into the cream mixture until everything is beautifully combined.
Churning
- Pour the mixture into your ice cream maker and churn according to the manufacturer's instructions until it reaches a soft-serve consistency.
- Transfer the ice cream into a lidded container and freeze for at least 4 hours, or until firm enough to scoop.
Serving
- Serve the cherry ice cream in bowls or cones, optionally topped with fresh cherries or chocolate syrup.