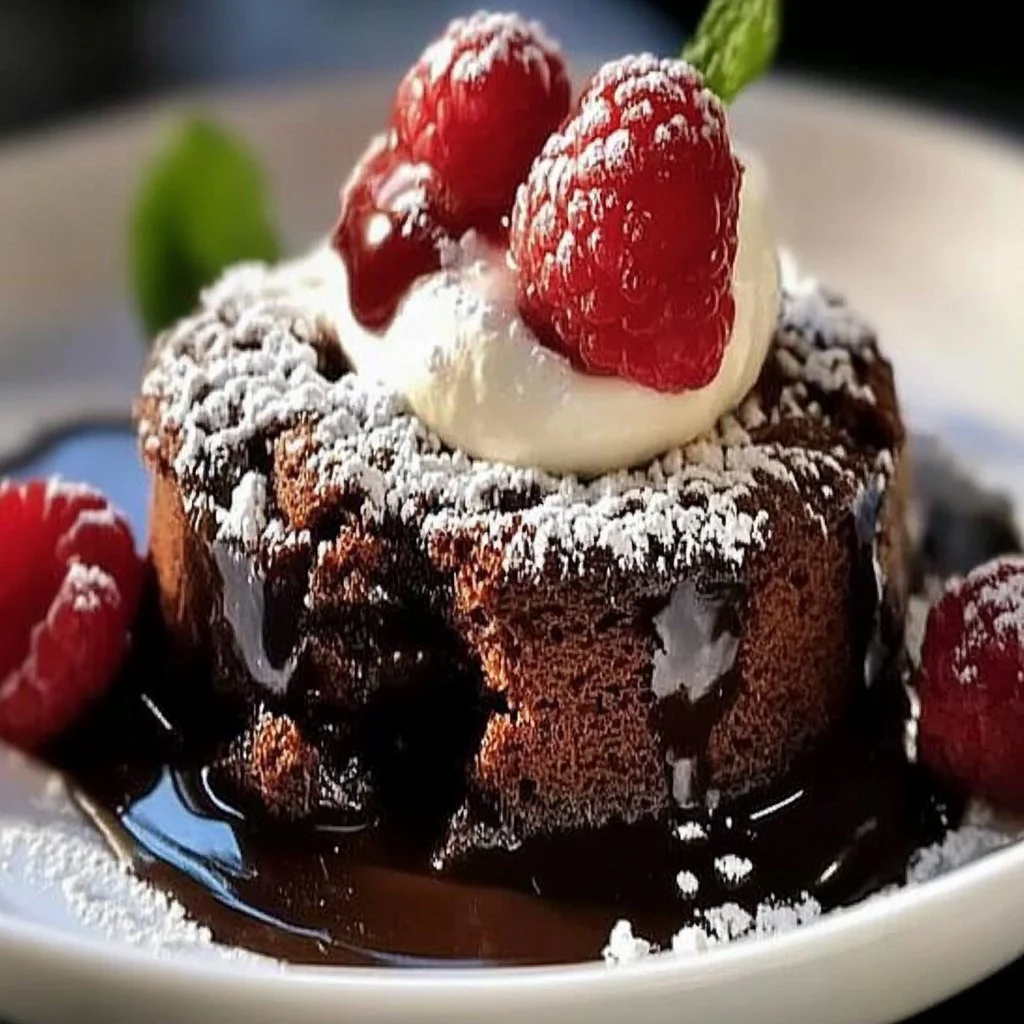
Lava Cake Recipe
There’s something utterly enchanting about a warm lava cake, as its molten center oozes chocolate richness with every forkful. This recipe promises a delightful indulgence that is equal parts decadent and exhilarating, perfect for satisfying your sweet tooth. Picture this: cutting into a delicate, soft exterior only to reveal a luscious, flowing chocolate center, inviting you to dive deeper into its warmth. Each bite transports you back to cherished memories of childhood desserts, making it a nostalgic treat worth baking for family and friends. Whether it’s a romantic dinner or a special celebration, the lava cake is sure to impress—cooking up quickly, it’s wonderfully kid-friendly, and it elevates any occasion. Let’s dive into why you need this sinfully delicious dessert in your life!
Ever Craved a Chocolate Embrace?
Have you ever found yourself dreaming of that perfect dessert, where the first bite melts away your worries? Imagine a moment when friends gather around the table, laughter fills the air, and you surprise everyone with these irresistible lava cakes. The rich scent of chocolate wafts around as you place the cakes in front of your loved ones, and their eyes widen with anticipation. The perfectly executed moment happens when they dig in and experience the warm burst of liquid chocolate. It’s pure joy—a sweet escape that melts hearts and tantalizes taste buds.
Why You’ll Love This Recipe
You’ll fall in love with this lava cake recipe for several reasons. First, it boasts a straightforward preparation method, making it accessible for both novice and experienced bakers. With minimal ingredients, you can create a dessert that appears fancy without the fuss. Each bite is an entire experience, rich in flavor and warmth, making it a guaranteed crowd-pleaser.
This dessert is not only quick but can also be made ahead, freeing you to enjoy special moments with your guests. Everyone, from little ones to adults, will love the thrill of uncovering that molten chocolate center.
Ingredients
- 4 oz Dark chocolate (Roughly chopped)
- ½ cup Unsalted butter (Plus extra for greasing ramekins)
- 2 Large eggs (Room temperature)
- 2 Egg yolks (Room temperature)
- ¼ cup Granulated sugar
- 2 tbsp All-purpose flour (Sifted)
- 1 pinch Salt (Optional)
- As needed Cocoa powder (For dusting ramekins)
- ½ tsp Vanilla extract (Adds depth)
- ½ tsp Espresso powder (Enhances chocolate flavor)
- 4 tsp Cold butter (Hidden in center Grandma’s trick)
- As needed Powdered sugar (For dusting before serving)
- As desired Heavy cream (Or vanilla ice cream)
- Optional Fresh berries (Strawberries, raspberries, etc.)
Imagine the bittersweet richness of dark chocolate balanced by the creaminess of unsalted butter, blending perfectly with the airy textures of eggs. An optional sprinkle of salt intensifies the flavors, while the hint of vanilla and espresso lingers on the palate, elevating the experience. When you finally reveal the cold butter resting in the center, the indulgent surprise is worth every minute spent in the kitchen.
Timing
Lava cakes grant you the ultimate speed and indulgence balance. Whipping this dessert up takes less than 20 minutes, meaning you can serve it fresh out of the oven in about 30 minutes total! It’s a fast and indulgent treat that doesn’t skimp on flavor or experience, maintaining a luxurious feel that belies its simplicity. Perfect for last-minute cravings or surprising guests—it’s sure to be the highlight of any dining occasion!
Step-by-Step
Preheat the oven to 425°F.
Get that oven nice and hot so your cakes can bake perfectly!Butter ramekins well and dust with cocoa powder.
Generously grease each ramekin to prevent the cakes from sticking; shake out the excess cocoa powder for a rich, chocolatey finish on the outside.Chop and melt chocolate with butter using a double boiler or microwave.
Stir until smooth, letting the warm chocolate mixture cool slightly—this is where the magic begins!Whisk eggs, yolks, and sugar until pale.
Aim for a light and airy texture; this will help the cakes rise beautifully.Mix in melted chocolate, then fold in flour and salt.
Gently combine everything, careful not to deflate the mixture.Divide batter into ramekins (¾ full).
Leave enough room for that delightful molten center to reveal itself!Bake for 12–14 minutes until edges are set and centers slightly jiggle.
The anticipation builds—do not overbake; the key is that gooey, runny center!Let sit 1 minute.
Patience is key—this is when your lava cake transforms into perfection.Run a knife around edges, invert onto plates, dust with powdered sugar, and serve immediately.
The ooze of warm chocolate will mesmerize everyone at the table—it’s an experience to behold!
Nutritional Information
Each lava cake generally contains around 350 calories. While this decadent sweet is meant as an occasional indulgence, it can absolutely be part of a balanced dessert menu! Rich in flavor, it’s a treat that satisfies the deepest of chocolate cravings. Remember, sometimes we all deserve a little bliss in the form of molten chocolate!
Healthier Alternatives
For those looking for alternatives without sacrificing the dreamy texture and flavor, there are several options. Use unsweetened applesauce instead of butter for a lower-fat version. Consider coconut flour or almond flour for a gluten-free twist. Moreover, sugar substitutes such as Stevia or monk fruit can help reduce sugar content without losing sweetness.
Serving Suggestions
Serve your lava cake warm, accompanied by a scoop of silky vanilla ice cream, or a drizzle of heavy cream for extra decadence. Consider garnishing with fresh berries like strawberries or raspberries for an added burst of freshness that complements the chocolate beautifully. These cakes are also perfect for holiday gatherings, romantic date nights, or simply as a special treat on a cozy evening at home.
Common Mistakes
Be cautious about overbaking your lava cakes—this common error leads to a solid cake instead of a molten center. Check them at the lower end of the baking time to ensure gooey perfection. Additionally, ensure your ramekins are well-greased, or you might find a sticky mess instead of a lovely cake.
Storing Tips
If you ever have leftover lava cakes (though they’re hard to resist!), store them in an airtight container in the refrigerator for up to 2 days. To reheat, place them in a preheated oven at 350°F for about 5 minutes or until warmed through. You can also freeze the unbaked batter in your ramekins and then bake them directly from the freezer, adding extra baking time if needed!
Tempted to Bake It ASAP?
Don’t let another moment pass without experiencing the joy of a homemade lava cake. It’s time to indulge in the rich, molten chocolate delight that’s bound to leave you and your guests spellbound. You deserve an experience that combines simplicity with decadence—bake this recipe today, and relish every luscious bite!
FAQs
Can I make lava cake in advance?
You can prepare the batter ahead of time and store it in the fridge before baking.What chocolate is best for lava cake?
Use high-quality dark chocolate for the richest flavor; avoid chocolate chips as they contain stabilizers.Can I substitute eggs in the recipe?
You can try using flax eggs, but the texture may vary slightly.How can I tell when the lava cake is done?
It should have set edges and a soft jiggly center.Can I make lava cakes in a muffin tin?
Yes! Just adjust the baking time, and keep an eye on them as they bake.
Get ready for an unforgettable dessert experience that’s as enjoyable to make as it is to eat! Dive in and let the magic of the molten center envelop you.