Pink Velvet Dream Cake Recipe
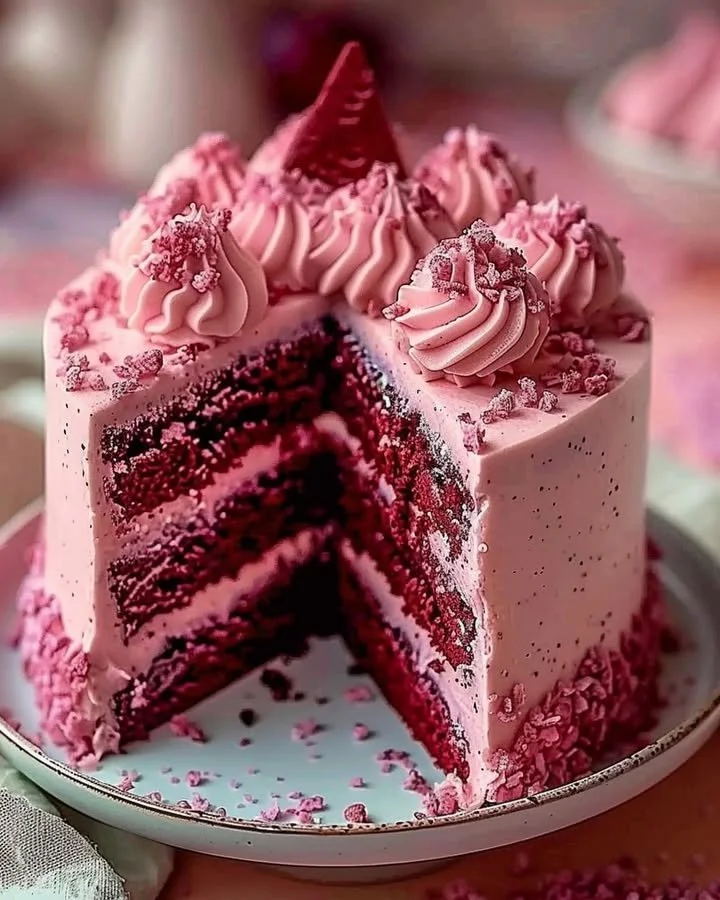
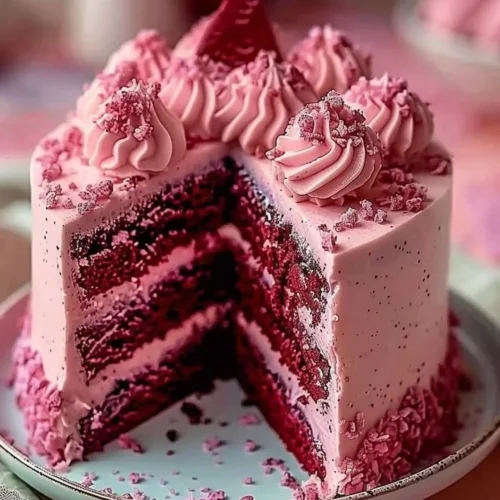
The Pink Velvet Dream Cake is an enchanting, luscious treat that will sweep you off your feet with its captivating color and velvety texture. As you prepare this delightful dessert, you can almost feel the anticipation swirling in the kitchen, blending aromas that evoke the warmth of love and celebration. Each bite reveals a tender crumb, where the rich, buttery taste melds seamlessly with the subtle undertones of cocoa and sweetness from the creamy frosting. This recipe provides a step-by-step guide to creating your very own Pink Velvet Dream Cake, ensuring that your baking experience is both enjoyable and rewarding.
History / Fun Fact
The origins of the velvet cake can be traced back to the Victorian era, where it gained popularity in North America. Its smooth, soft texture was delightfully rich, and the addition of red cocoa made it a visually stunning centerpiece. The color became particularly appealing when combined with cream cheese frosting, leading to what we now recognize as red velvet cake. Over time, bakers began to experiment, giving birth to new variations, including the heartwarming Pink Velvet Dream Cake. This cake is more than just a dessert; it is a celebration of moments shared with family and friends, often gracing tables at birthdays, anniversaries, and even festive gatherings.
Ingredients
To create the Pink Velvet Dream Cake, gather the following ingredients that bring vibrant flavors and lovely textures:
- 2 1/2 cups all-purpose flour: This essential ingredient contributes to the cake’s lightness and structure.
- 1 1/2 cups granulated sugar: This sweet component brings balance and elevates the flavors.
- 1 tsp baking soda: A key leavening agent that helps the cake rise beautifully.
- 1 tsp salt: Enhances the overall flavors and balances sweetness.
- 1 tsp cocoa powder: Adds depth and richness without overpowering the pink hue.
- 1 1/2 cups vegetable oil: Provides moisture, ensuring a tender crumb.
- 1 cup buttermilk, at room temperature: Gives acidity that works in harmony with baking soda, creating a fluffy cake.
- 2 large eggs, at room temperature: Adds richness and aids in the bonding process of the batter.
- 2 tbsp red food coloring: The magic ingredient that transforms the batter into a delightful blush.
- 1 tsp white vinegar: A vital addition that reacts with baking soda, promoting fluffiness.
- 1 tsp vanilla extract: Infuses the cake with a warm and inviting aroma.
- 8 oz cream cheese, softened: The star of your frosting, offering irresistible creaminess.
- 1/2 cup unsalted butter, softened: Adds richness and helps achieve a velvety texture.
- 4 cups powdered sugar: Creates the desired sweetness and structure for frosting.
- 1 tsp vanilla extract: Enhances the flavor of your frosting, making it more aromatic.
Cooking Time & Tips For Pink Velvet Dream Cake
When it comes to cooking time, the Pink Velvet Dream Cake typically takes about 25-30 minutes to bake. A quick preparation involves gathering ingredients and mixing them together, while a slow, deliberate approach can result in a more focused baking experience that allows you to savor every moment of the process.
For optimal results, be sure to measure your ingredients accurately. Room temperature eggs and buttermilk allow for better emulsification, while sifting flour can ensure an even texture. Don’t rush the cooling process, as it plays a crucial role in frosting application—warm cake can melt your lovely cream cheese frosting. Finally, always taste your frosting, adjusting the sweetness to suit your preferences, and enjoy the creative freedom to personalize the decoration!
Step-by-Step Directions
Begin your Pink Velvet Dream Cake journey by preheating your oven to 350°F (175°C). Grease and flour two 9-inch round cake pans, making sure to cover every inch to avoid any sticky surprises down the road.
In a large mixing bowl, whisk together the all-purpose flour, granulated sugar, baking soda, salt, and cocoa powder. The ingredients will start to take on a slightly dark hue, showcasing that chocolaty richness waiting to blend with the vibrant pink.
In another bowl, whisk together the vegetable oil, buttermilk, eggs, red food coloring, white vinegar, and vanilla extract until the mixture is smooth and uniform. The vivid red color bursts forth, and you can almost feel the excitement building.
Gently incorporate the wet ingredients into the dry mixture, careful not to overmix. You want just enough blending to create a harmonious batter that is both silky and inviting. Once combined, divide the luscious pink batter evenly between the prepared cake pans.
Slide the pans into the oven and let the magic begin! Bake for 25-30 minutes or until a toothpick inserted in the center comes out clean. The kitchen will be filled with a delightful aroma that entices everyone near.
Once baked, allow the cakes to cool in the pans for about 10 minutes. Gently transfer them to a wire rack to cool completely—patience is key, as frosting a warm cake is a sticky situation.
Meanwhile, let’s whip up the cream cheese frosting: beat the softened cream cheese and unsalted butter together in a bowl until they become smooth and creamy. Slowly incorporate the powdered sugar and vanilla extract, continuing to mix until the frosting is light and airy.
Once the cakes have cooled completely, place one layer on a beautiful serving plate, showcasing that lovely pink hue. Spread a generous amount of cream cheese frosting on top, letting it flow slightly over the edges. Then place the second cake layer atop the first, carefully frosting the top and sides with the remaining cream cheese frosting. Feel free to bring your artistic flair into the decoration, sprinkling edible flowers, pink sprinkles, or even fresh fruit for an added touch of magic.
Serving Suggestions & Occasions
The Pink Velvet Dream Cake is the perfect centerpiece for a variety of celebrations. Imagine presenting it at a birthday party, adorned with vibrant candles, or serving it at an anniversary dinner where love and joy fill the room. This cake also makes for a delightful addition to bridal showers or baby showers, capturing the essence of celebration and sweet beginnings. Pair it with a hot cup of coffee or tea for a comforting afternoon treat, or enjoy it with bubbly beverages that sparkle just as much as the cake itself.
Common Mistakes For Pink Velvet Dream Cake
When baking the Pink Velvet Dream Cake, a few common pitfalls can lead to less-than-perfect results. One crucial error is overmixing the batter; this can create a tough texture instead of the tender crumb you desire. Another common mistake is not measuring ingredients accurately, which can throw off the delicate balance of your cake. Be cautious with the baking time—underbaking will lead to a gooey center, while overbaking will dry out your cake. As a final tip, avoid overly warm cakes when frosting. Since the cream cheese frosting can melt in high heat, wait until the layers are completely cooled for that flawless finish.
Healthier Alternatives & Variations
If you want to explore healthier options without compromising flavor, consider these alternatives. Swap half of the all-purpose flour for whole wheat flour to incorporate more fiber. You could also replace granulated sugar with natural sweeteners like maple syrup or agave nectar, ensuring to adjust the liquid amounts in your recipe. For a lower-fat version, use Greek yogurt instead of cream cheese in your frosting; this will give you a tangy twist while cutting down on calories. Additionally, play with flavors by adding citrus zest or spices, or try incorporating fruit purees into the batter for a unique twist on this classic treat.
FAQs
Can I use different food coloring for the Pink Velvet Dream Cake?
Yes, you can use natural food coloring or even beet juice for a more organic approach to achieving the pink hue.Is there a vegan variation for this recipe?
Absolutely! Substitute eggs with flaxseed meal mixed with water, and use plant-based milk and butter alternatives for a vegan-friendly version.How should I store leftover cake?
Store the cake in an airtight container at room temperature for up to three days or refrigerate it for up to a week.Can I freeze Pink Velvet Dream Cake?
Yes! Wrap the cooled cake layers in plastic wrap and aluminum foil, and they can be frozen for up to three months.What should I do if my cake sinks in the middle?
Cake sinking often indicates that it was underbaked. Ensure to check for doneness with a toothpick before removing from the oven.Can I double this recipe?
Yes! Simply double the ingredients and use the same baking instructions, using larger or additional pans as needed.
Conclusion
Now that you have discovered the secrets of creating your very own Pink Velvet Dream Cake, it’s time to embark on this delightful baking adventure. The vibrant colors, luscious flavors, and creamy frosting will captivate anyone fortunate enough to indulge in this sweet masterpiece. Bring a touch of joy, celebration, and love to your next gathering with this beautiful cake—the smiles and satisfied sighs will be well worth the effort. Bake it, share it, and let it become a cherished memory in your culinary journey. So grab your mixing bowl, and let the aromas of this lovely cake fill your kitchen today!
Pink Velvet Dream Cake
Ingredients
Cake Ingredients
- 2 1/2 cups all-purpose flour Contributes to the cake’s lightness and structure.
- 1 1/2 cups granulated sugar Brings balance and elevates flavors.
- 1 tsp baking soda Key leavening agent.
- 1 tsp salt Enhances overall flavors.
- 1 tsp cocoa powder Adds depth without overpowering the pink hue.
- 1 1/2 cups vegetable oil Provides moisture.
- 1 cup buttermilk, at room temperature Gives acidity for fluffiness.
- 2 large eggs, at room temperature Adds richness.
- 2 tbsp red food coloring Transforms batter color.
- 1 tsp white vinegar Helps promote fluffiness.
- 1 tsp vanilla extract Infuses warm aroma.
Frosting Ingredients
- 8 oz cream cheese, softened Main component for frosting.
- 1/2 cup unsalted butter, softened Adds richness to frosting.
- 4 cups powdered sugar Creates desired sweetness.
- 1 tsp vanilla extract Enhances frosting flavor.
Instructions
Preparation
- Preheat your oven to 350°F (175°C) and grease and flour two 9-inch round cake pans.
- In a large mixing bowl, whisk together the all-purpose flour, granulated sugar, baking soda, salt, and cocoa powder.
- In another bowl, whisk the vegetable oil, buttermilk, eggs, red food coloring, white vinegar, and vanilla extract until smooth.
- Gently incorporate the wet ingredients into the dry mixture, careful not to overmix.
- Divide the batter evenly between the prepared cake pans.
Baking
- Slide the pans into the oven and bake for 25-30 minutes or until a toothpick inserted comes out clean.
- Allow the cakes to cool in the pans for about 10 minutes before transferring to a wire rack to cool completely.
Frosting
- Beat the softened cream cheese and unsalted butter together until smooth.
- Slowly incorporate the powdered sugar and vanilla extract, mixing until light and airy.
- Once the cakes are completely cooled, frost the top of one layer and place the second layer on top, frosting the top and sides.
Decoration
- Decorate as desired with edible flowers, sprinkles, or fresh fruit.